Fill in a relation matrix
Use a relation matrix to find empty cells and maintain the records behind its cells. The rows, columns, fields and actions come from your model. See Relation matrices for cell states, limits and permissions.
Read the matrix
Section titled “Read the matrix”- Open an application in the current workspace and choose a collection with a relation matrix. Select its matrix view where tabs are offered. Check the heading, row type and column headings.
- Check the banner. Choose Live for immediate changes, or open a change set to stage them. A publication is read-only.
- Read the legend above the table. One and Several count related records under the model’s rule. Inactive means records exist but none counts. None means no related record is present and no earlier-publication record is available to show; History only has content from an earlier publication; Conflict needs inspection because more than one record counts where only one is allowed.
- Search for a row and check its identifying fields. Open a cell under the intended column. The dialog heading combines the row and column, so check both before changing anything. You can focus the matrix and use arrow keys between cells, then Enter to open one.
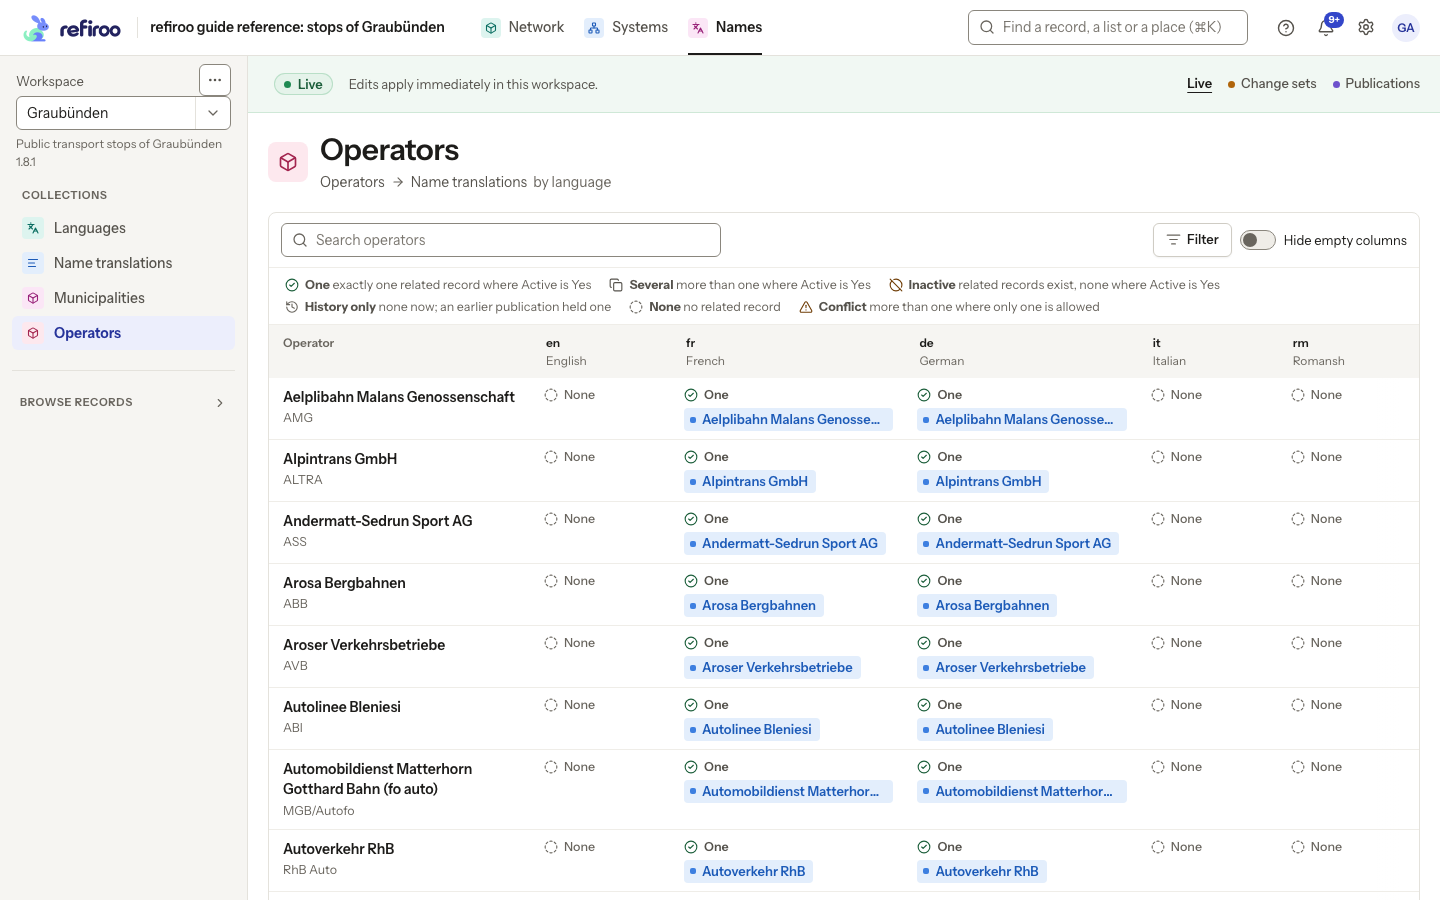
Above: Operator names in Names has many None cells. French and German contain name records. The legend explains Active is Yes as the condition for counting in this example.
The same steps apply when columns represent something else:
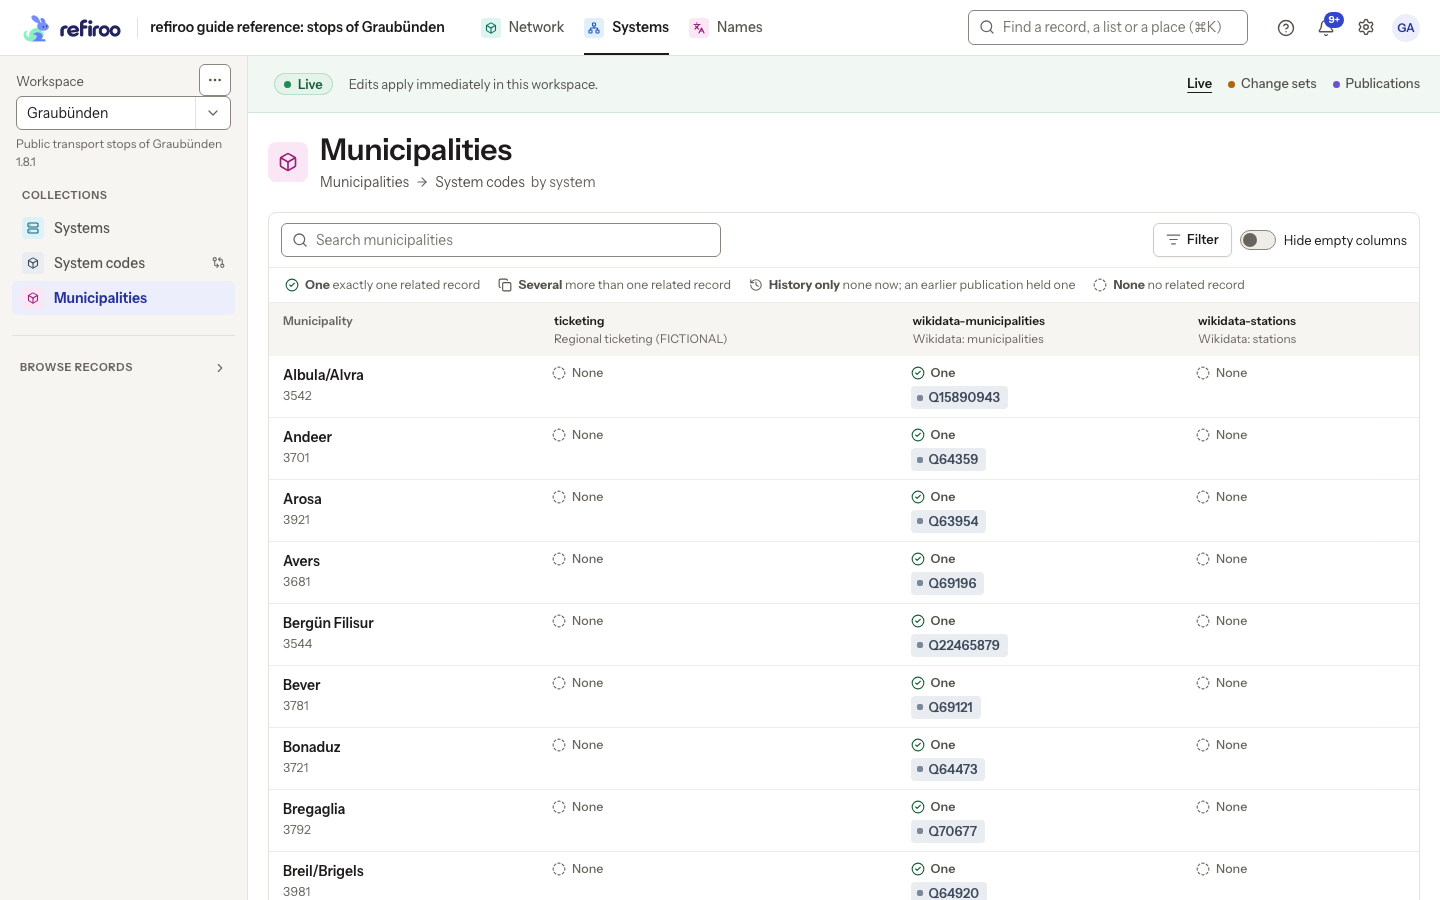
Above: Municipalities by system in Systems compares System codes under their systems. One means exactly one related record here, without the name matrix’s Active condition.
Choose which columns to show
Section titled “Choose which columns to show”A matrix includes all records of its column type by default, even those that do not concern the rows you are working on. Hide empty columns automatically, or choose specific columns yourself.
Hide empty columns
Section titled “Hide empty columns”- Set the row search and scope to the rows you want to work on, then turn on Hide empty columns beside Filter. The matrix keeps columns with a related record in at least one of those rows, including rows not yet on screen. Use the column navigation to reach more columns; empty columns do not take up places on its pages.
- If the switch says No effect while columns are chosen in Filter, open Filter, choose Show all followed by the column type’s plural name, then Done. This clears the chosen columns and any cell-state restriction, allowing the switch to take effect.
- When columns are hidden, read the N empty columns hidden line below the toolbar. Choose Show all on that line, or turn the switch off, to bring them back.
The switch is remembered for this view in this browser. Before checking for missing connections, turn it off or choose the columns to check explicitly, so wholly empty columns are included. See Filters and coverage for how the setting works with search, scope, change sets and publications.
Choose specific columns
Section titled “Choose specific columns”- Choose Filter. In the section named after the column type followed by to show, search for and select the columns you need. You can select up to 20; deselect one before adding another if you reach the limit.
- Leave Cell state on Any state, or choose it to remove an existing state restriction. Choose Done. The matrix shows only your selected columns.
- To clear your selection, open Filter and choose Show all followed by the column type’s plural name, then Done. Use the column navigation if they do not all fit on one page. This also clears any cell-state restriction. If Hide empty columns is on, it takes effect again; turn it off to bring every column back.
Your choice belongs to the page you have open; it is not saved as a setting for the view and does not change what other people see. Bookmark or share the page’s address to reopen the same column selection. Opening the view again from the navigation clears that selection, but keeps your Hide empty columns setting.
Find empty cells across the list
Section titled “Find empty cells across the list”- Clear the row search if you intend to check the whole list, then choose Filter.
- In the section named after the column type followed by to show, search for and select the columns to check. The chooser can show up to 20 selected columns at once.
- Under Cell state, choose None, then Done. Rows remain when at least one chosen column has that state, across the whole list. If you choose a state without selecting columns first, it applies to the columns currently shown.
- Inspect the result. No rows match these filters means no matches within this search and column selection. Check omitted columns separately before concluding coverage is complete.
- To inspect existing records that do not count, choose Inactive where offered. Choose Any state or remove the state pill with × to remove the state restriction. Clearing the column selection also clears that restriction.
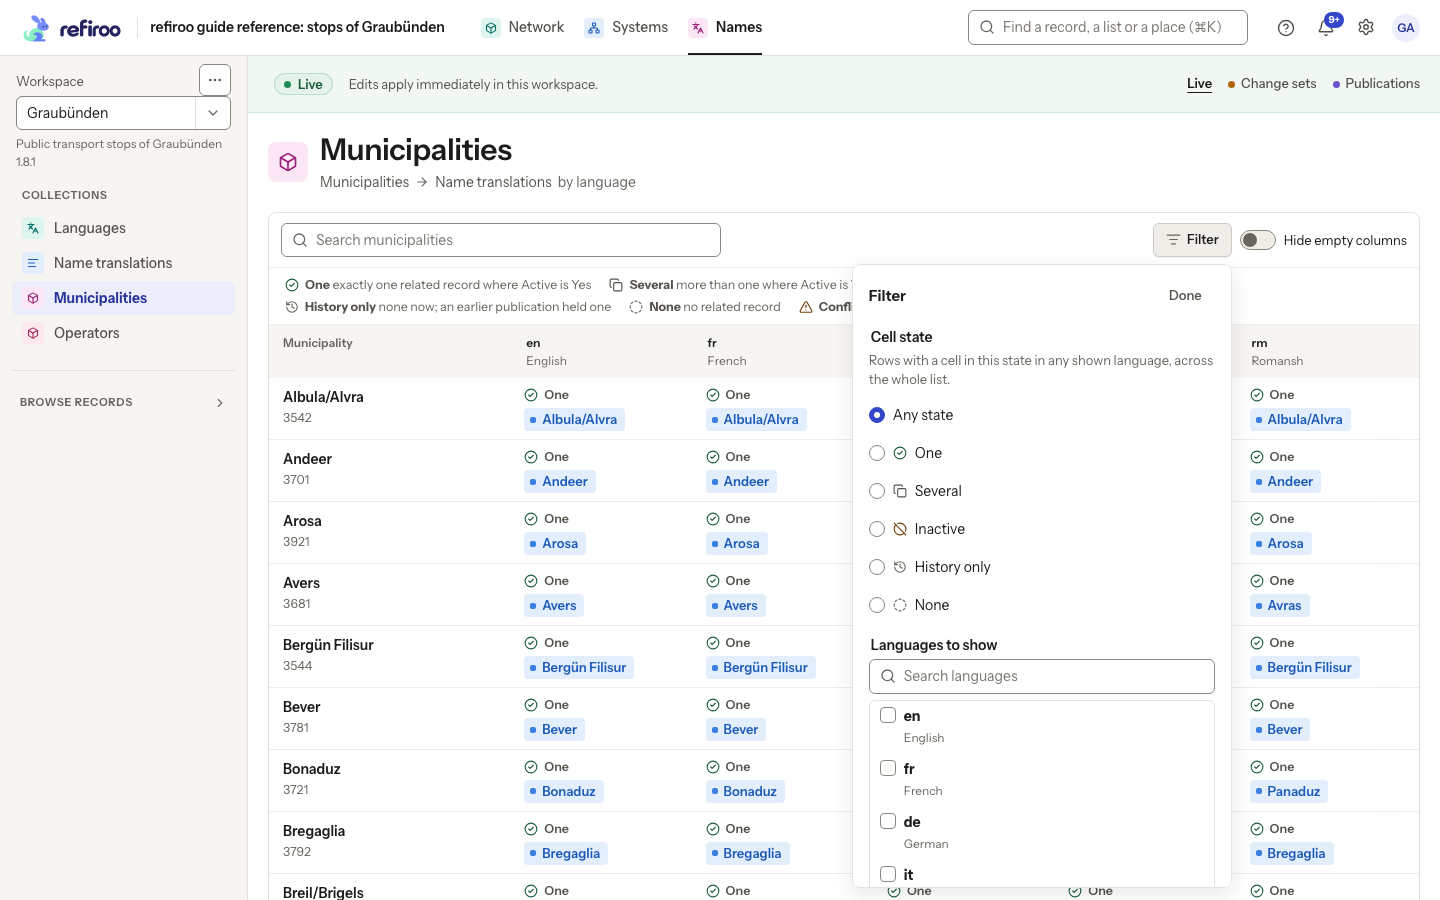
Above: Municipality names offers Languages to show, with English, French, German, Italian and Romansh. The state filter tests the chosen or shown languages, not hidden languages.
Fill an empty cell
Section titled “Fill an empty cell”- Open the intended None cell. Check the row and column in the heading and the message that no related record exists yet.
- Choose Create followed by the related type’s name, where offered. The form identifies the row and column under For and under.
- Check Name, which identifies the new record. Review the proposed name rather than treating it as the field content. Under Goes in, check where it will belong. The relationship’s rules can fix a group; otherwise refiroo selects the group already holding the most records used by this view in this column. A tie leaves the choice open. An unused group is never selected just because it is the only one. Use Search places… to choose another offered group.
- Fill the type’s content fields. Set any checkbox or field that determines whether it counts according to the legend. Fill Attributes of the relationship, if shown: these describe the new connection rather than the record itself. Choose the form’s Add action followed by the cell type’s name. On success, the dialog closes and the cell refreshes; check its state and displayed content.
- Use Back to abandon the creation form and return to the cell, then Close to leave without creating anything. If creation is refused, correct the named problem before retrying.
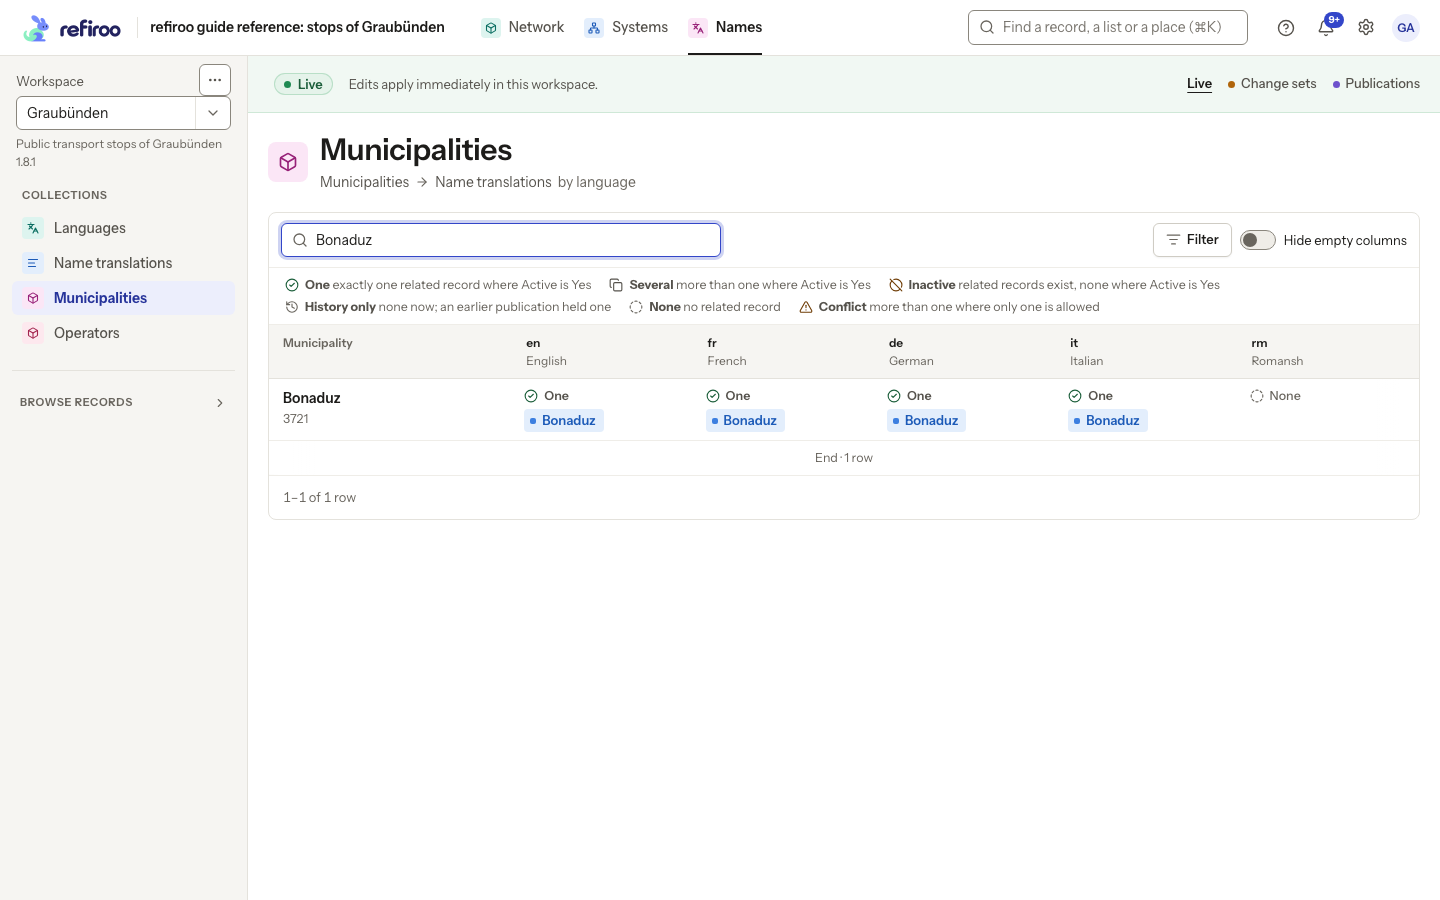
Above: Bonaduz in Municipality names has One in four languages and None in Romansh. The empty cell was prepared for these captures and filled again afterwards; it is not the reference data’s current state.
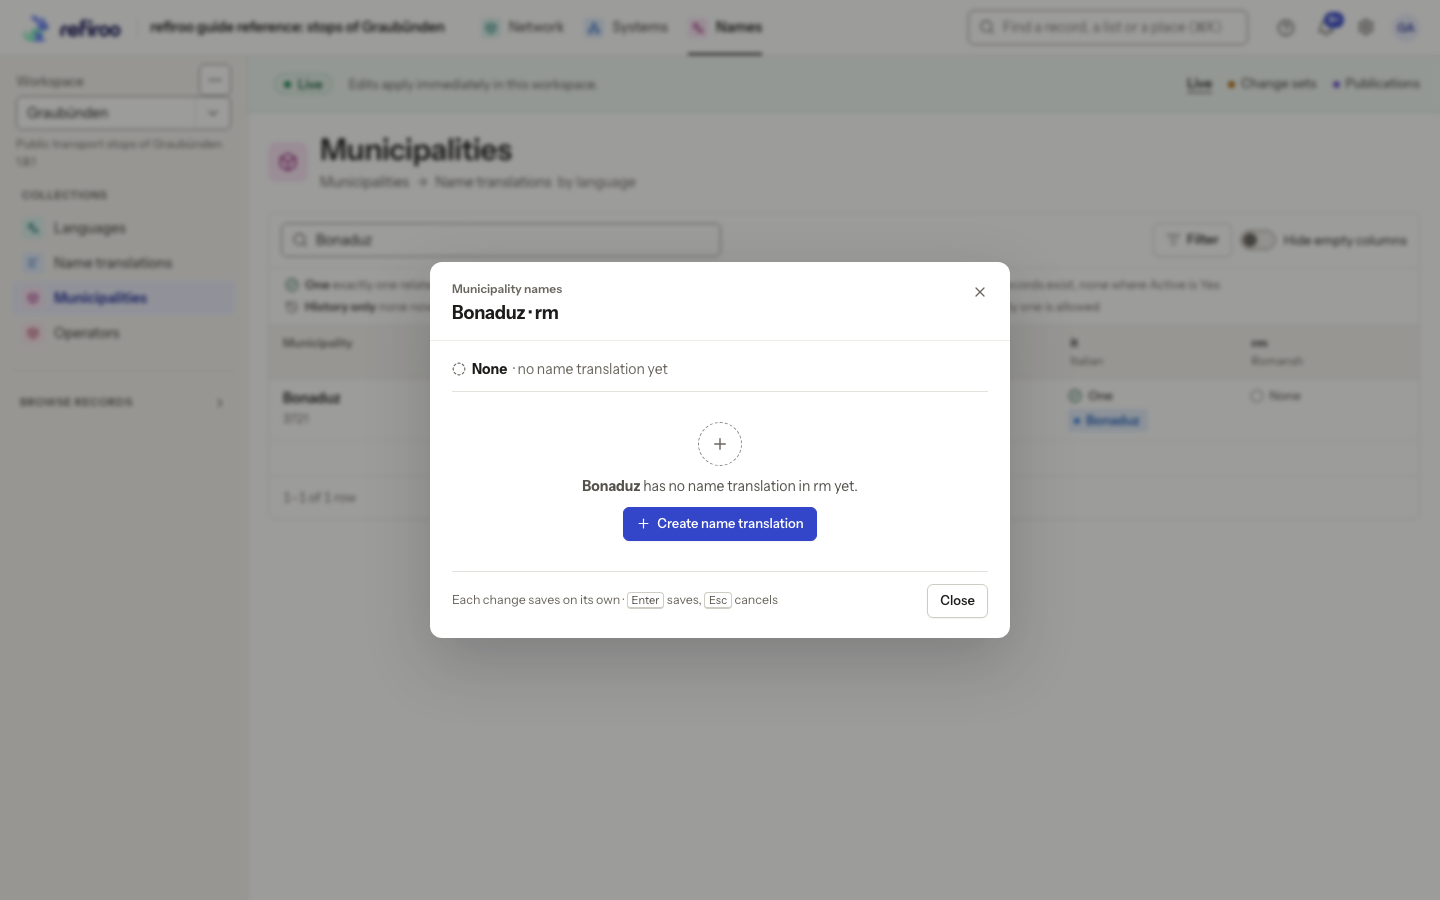
Above: Bonaduz · rm says None · no name translation yet and offers Create name translation.
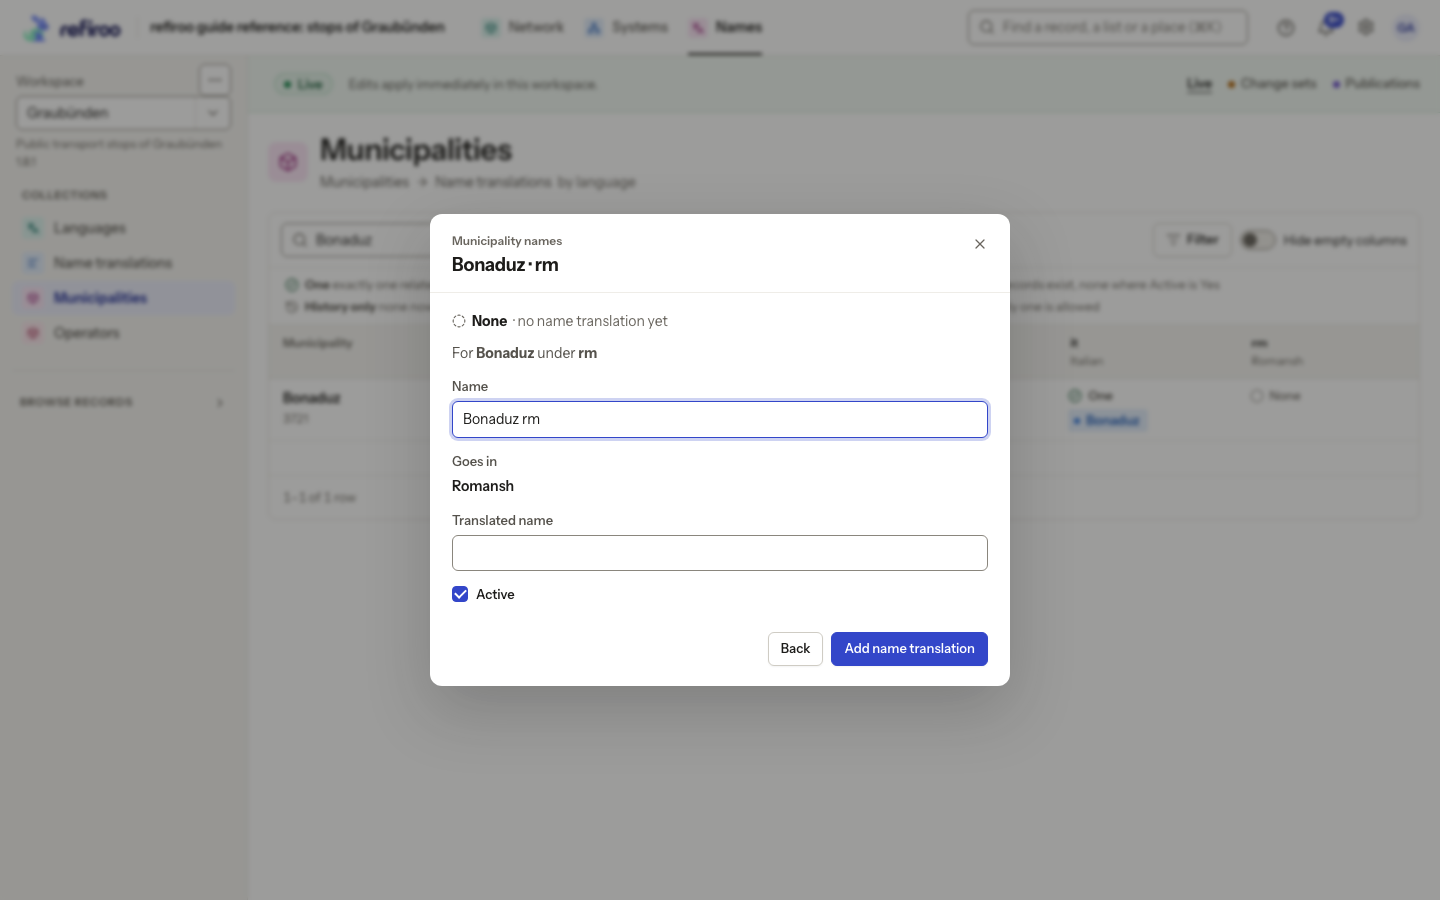
Above: For Bonaduz under rm fixes the cell. Name is proposed as Bonaduz rm; Goes in is Romansh. Translated name is empty and Active is selected. Back was used without saving this form.
If Link existing followed by a type name is offered, use it when the desired record already exists. Search, inspect the candidate and any refusal reason, select an eligible record, fill Attributes of the relationship if offered, and choose Link. This adds a connection instead of creating another record.
When a new group is proposed
Section titled “When a new group is proposed”If the relationship’s rules identify one group and it is missing, Goes in says (will be created). Saving creates that group, the record and its connection together.
When neither the rules nor existing records give a place, refiroo can propose a new group named like the groups this view uses in other columns. Review Name of the new … and change it if needed. Submit the creation form once to create both group and record. Where offered, Use an existing group instead opens the group choices. Only places compatible with the relationship’s rules are offered. If no proposal or suitable place is available, resolve the missing place in the app before creating the record. No model change is needed to accept a proposed group.
Add another record or reuse one
Section titled “Add another record or reuse one”- Open a filled cell and inspect the records already connected to the row. If the cell allows several records and the view permits creation, Create appears beside Link existing.
- Choose Create when this is a new record. Choose its Goes in container and fill its fields as for an empty cell. The record is also listed in that container; it is not stored only inside the matrix.
- Choose Link existing when the record already exists under this column. Search the candidates and read any reason beside a disabled choice. An existing link or a relationship limit can prevent selection. Select an eligible record, fill any Attributes of the relationship, then choose Link.
- Check the refreshed cell. Linking adds a relationship to the existing record. Where the relationship permits reuse, that record can appear under several rows. Editing its own fields affects that shared record; each connection keeps its own relationship values.
Example: a mapping matrix. A code already connected to one row can also be linked to another where the model permits it. Reuse keeps the same record identity. Create makes a separate record and a new connection. After publication, connected systems see the corresponding connections where their access includes them.
A filled cell that may hold only one record does not offer Create. Inspect or edit the record already there. Empty, inactive and history-only cells can still offer creation where configured. For example, a translation matrix may permit one counting name per language: create a missing name, and edit an existing one rather than adding another counting name. Publishing makes the new record and its connection available to connected systems that expose them.
Correct an existing cell record
Section titled “Correct an existing cell record”- Remove a missing-cell filter before searching for an existing record. Find the row and open the cell under the intended column.
- The cell opens a table with one row per linked record. Use its filter box to narrow record names and displayed record fields. Read the record’s columns first, then the tinted Attributes of the relationship columns. Choose Open for its full page and history.
- Edit the intended value in place. A Yes or no checkbox saves with one click. For another field, open its input and enter the value. Click elsewhere or press Tab to save; Enter also saves a single-line field. In text of several lines, Enter adds a new line and Ctrl+Enter (Cmd+Enter on a Mac) saves. Escape puts the old value back; an unchanged input closes without saving or showing a notice. A saved input shows ‹Field› saved with Undo, including for a relationship’s value or a value set for the first time. To remove an optional value, empty its input and leave it; ‹Field› removed offers Undo. A refused input stays open with the reason and Cancel and Save again beneath it. Correct the input before leaving it to retry, or choose Save again after reviewing the reason. Check the refreshed value and any error.
- Check the condition for counting before switching an availability checkbox off: the cell can become Inactive without removing the record. Successful inline saves leave the table open. If a row disappears from a state-filtered matrix, select Any state to find it again.
- To remove a permitted connection, choose Unlink on its row. Read the confirmation there: Keep cancels, Unlink confirms and keeps the related record. Choose Close when done.
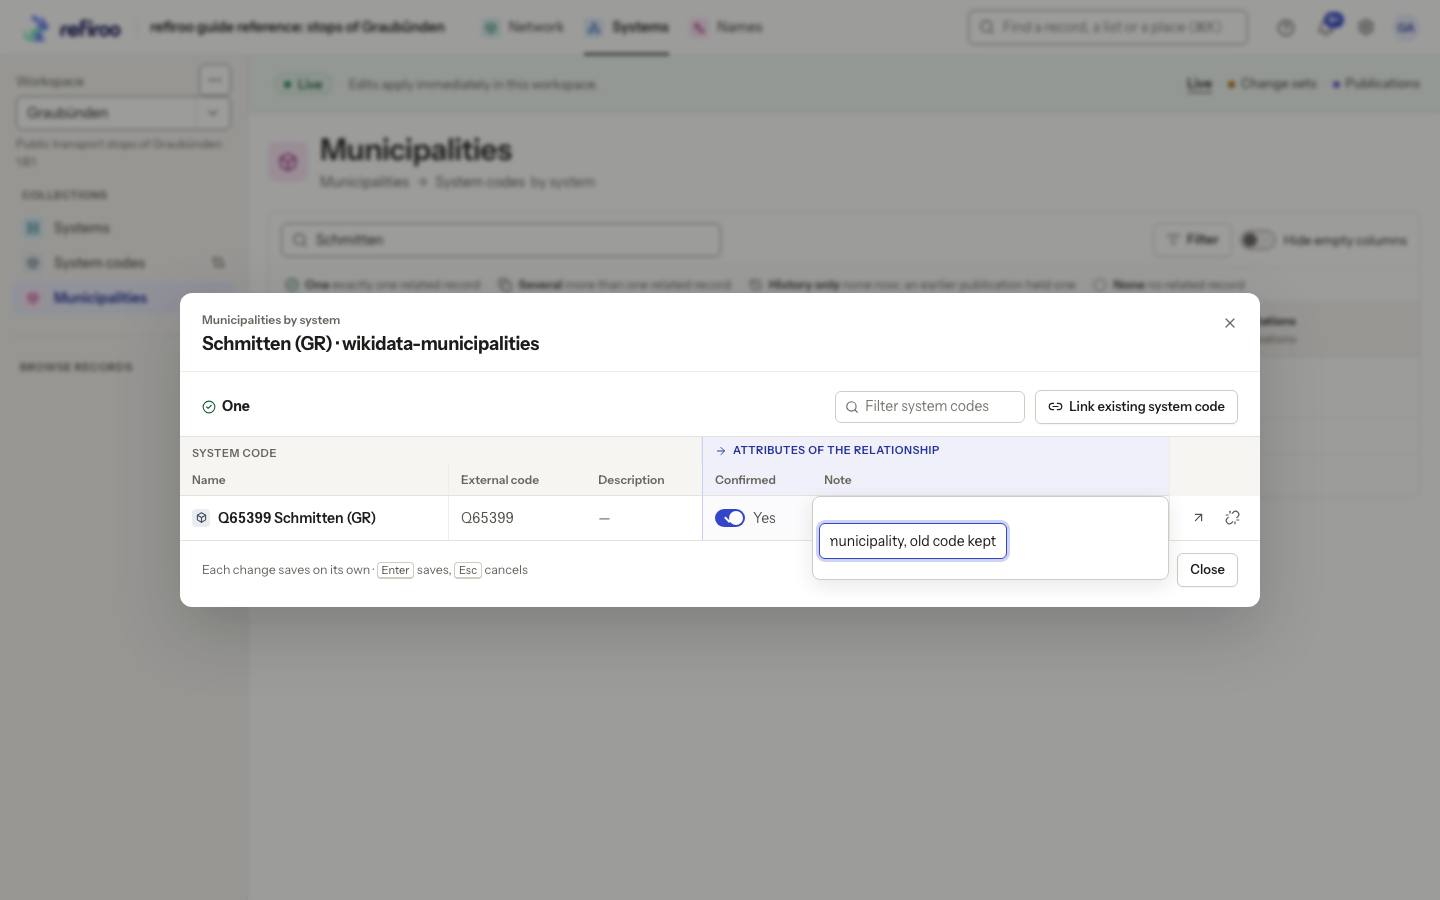
Above: the Schmitten (GR) cell under wikidata-municipalities in Municipalities by system in the Graubünden workspace. One code, Q65399, has Confirmed ticked and the Note editor open with “Merged municipality, old code kept”. These values belong to its connection to the municipality.
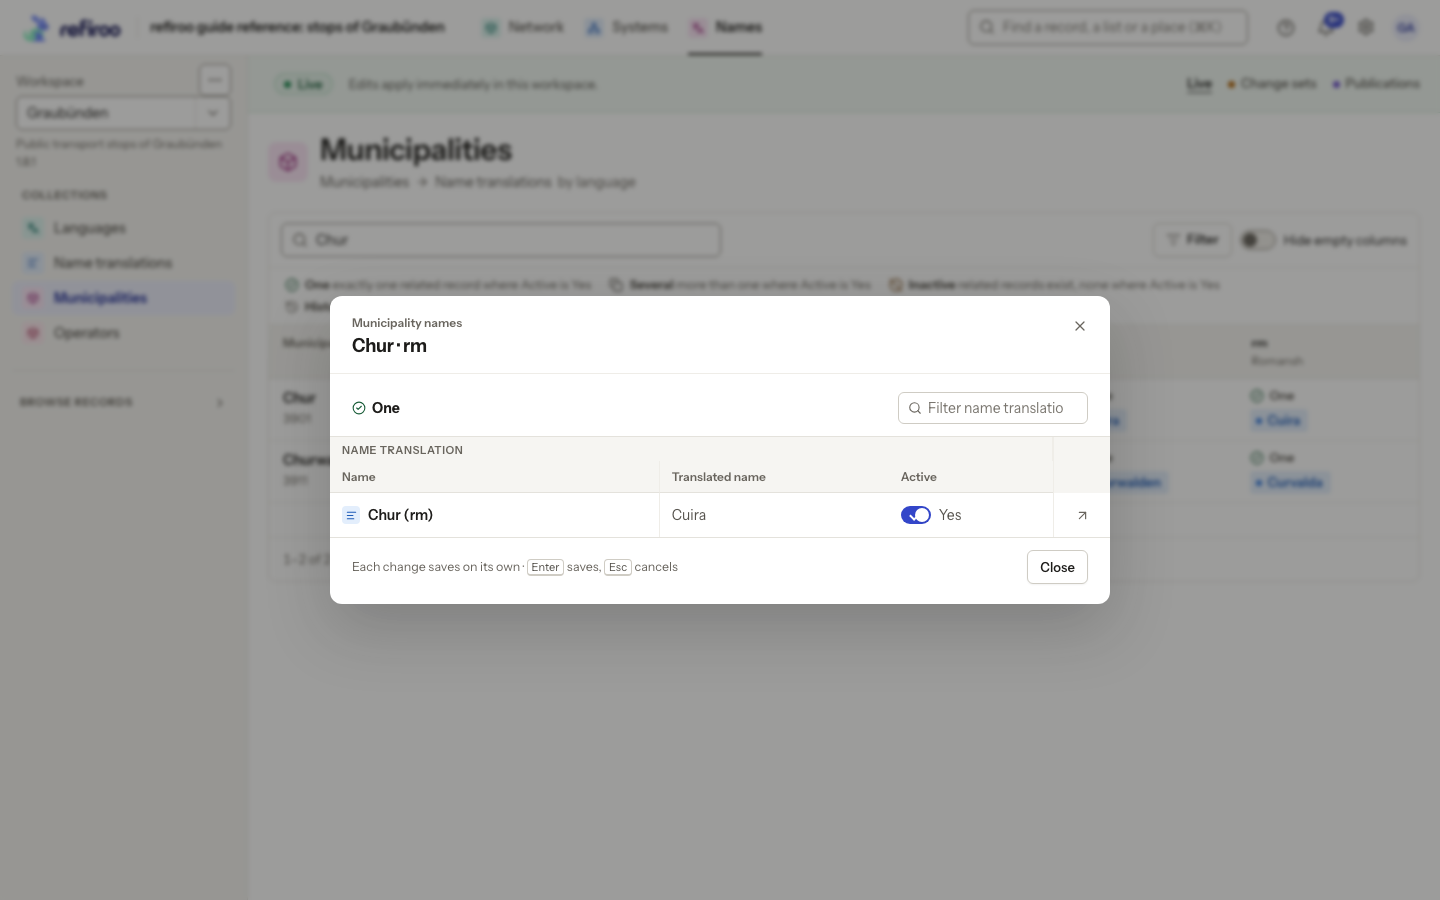
Above: Chur · rm opens the Romansh name Cuira with Active selected. Open Chur (rm) leads to the full name record. Each field saves on its own; Close returns to the matrix.
In a one-per-column counting rule, a change set can temporarily hold two counting records for one cell. It shows Conflict with the count. Open it and inspect both records. Correct which records meet the counting condition, or Unlink an unintended connection where permitted. Unlink keeps the record. Validate the change set again before publishing; resolve any remaining refusal through the affected record’s full page. Live writes refuse a second counting record. A conflict in proposed work is not a published extra value. See Cell states.
For an Inactive cell, review existing records before adding another. For Several, inspect the records before deciding whether anything needs changing; several may be allowed. For Conflict, resolve the extra counting records before publication. Where Unlink is offered, it asks for confirmation and keeps the related record; required ownership cannot be removed this way. To add an owned record from its owner’s full page instead, follow Create an owned related record.
For History only, inspect the read-only content from the named earlier publication. Where Create from this is offered, it opens creation with those values supplied. Review Name, container and fields before creating a new record; it does not undo a deletion or restore the old record’s identity and history.
When a save or read fails
Section titled “When a save or read fails”A duplicate refusal can offer Open the … already here. Inspect that record instead of creating another. If Changed elsewhere appears, review the refreshed cell and your retained input before retrying. If the record moved out of the cell, inspect the current contents first. A loading failure needs a retry, not a new record to fill an apparently empty cell.
If actions are missing, check that the context is editable, you have Edit live or Work in change sets as appropriate, and the model offers the intended action. Reader can inspect cells. A matrix is not a promise that every visible cell can be edited.
Screenshot data: Source: opentransportdata.swiss, Service Points (Didok), Federal Office of Transport / SBB, snapshot 2026-11-02. Wikidata, CC0. See The example data for sources and fictional additions.